


User profile
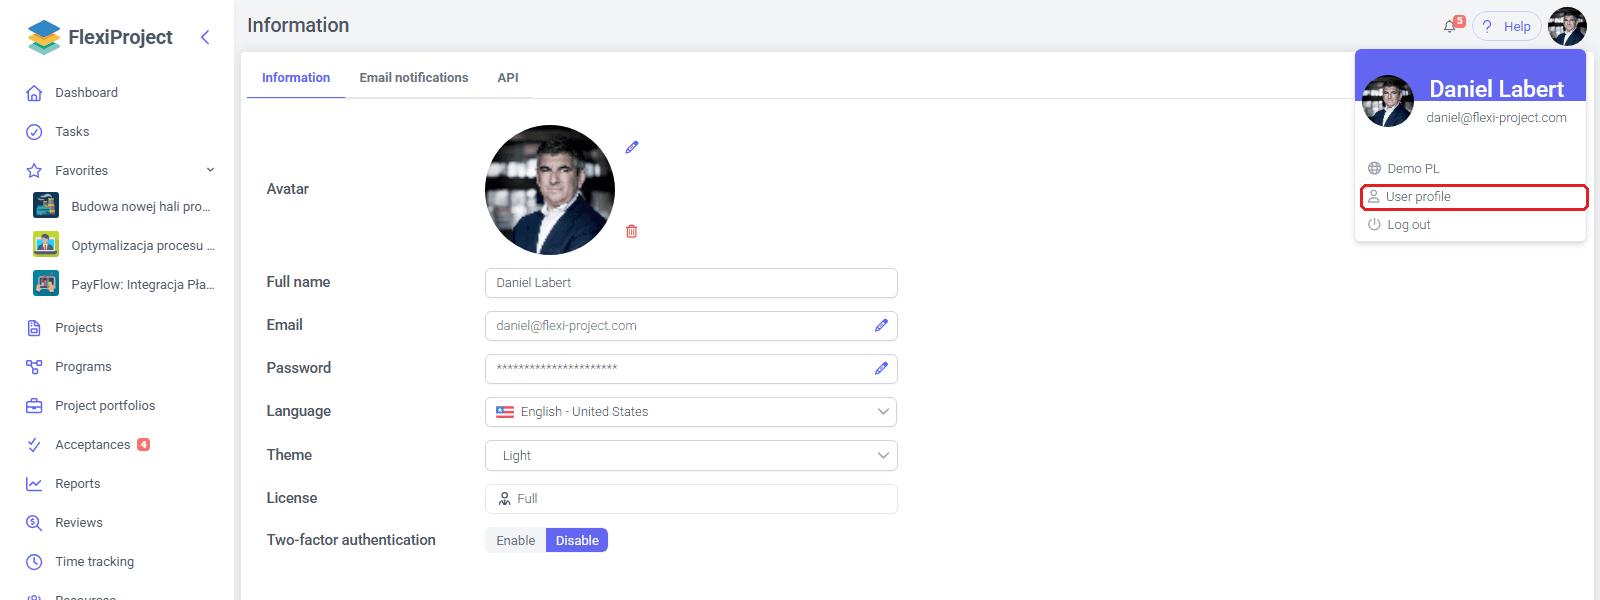
The user profile holds the account details and personal application settings. Open it from the avatar menu (top right corner) with the User profile command. It has the tabs Information, Email notifications (see Notifications) and, with a Full license, API with personal access tokens (see API and API token).
Every user manages their own account: name, password and e-mail address, language, theme and security. Settings for the whole organization, such as sign-in methods, are in System settings.
Information tab
The Information tab contains these fields:

- Avatar — the user’s picture; change or remove it in the avatar field.
- Full name — saved after you change it; the field cannot be empty.
- Email and Password — with a pencil icon that opens the change (see Changing the e-mail address and Changing the password).
- Language (see User language) and Theme — Light or Dark.
- License — the type of license assigned to the account, read-only (see Licenses).
- Two-factor authentication (see Two-factor authentication).
Changes are saved immediately and a confirmation appears.
Changing the e-mail address
- Open the avatar menu and choose User profile. The Information tab opens.
- Click the pencil icon next to the Email field. The Email window opens.
- Enter the new address and click Update. The message An e-mail with confirmation link has been sent. appears.
- Click the confirmation link in the message sent to the new address.
- Click the confirmation link in the next message, which arrives at your current address. A confirmation follows: Email changed successfully.
The address must be unique in the system. If it is taken, the message The typed E-Mail is taken appears.
Changing the password
- Open the Information tab in the user profile.
- Click the pencil icon next to the Password field. The Change password window opens.
- Enter the Current password, the New password and Confirm new password.
- Click Change password. The message Password has been changed appears.
The new password has at least 8 characters, including a lower case letter, an upper case letter, a digit and a special character. When the current password is wrong, Current password is invalid appears, and when the new password and its confirmation differ, New password and confirmed new password don’t match.
Password recovery
- On the sign-in page, click Forgot password? below the sign-in button.
- Enter the e-mail address linked to the account and click Send.
- Open the message with the password change link and click the link.
- Enter a new password that meets the requirements and confirm. Once the password is set, you are signed in.
The password change link is valid for a limited time. After it expires, the message Your password reset link has expired. Generate a new link to change your password. appears — recovery then starts again. The Return to login page link takes you back to sign-in.
An account that signs in only through single sign-on (see Sign-in methods) has no password to recover.
Protection against automated attacks
The password recovery and account registration forms are protected by an invisible reCAPTCHA check. The user does not solve any task — the browser sends the verification result together with the form. If the registration check fails, the page We have suspended the registration option appears, asking you to try again in a few minutes.
Note: reCAPTCHA protection works only in the cloud version of FlexiProject; self-hosted (on-premise) installations do not have it.
E-mail confirmation when creating an account
A new account is created after you click a link in an e-mail message: in the cloud after registration (Confirm e-mail address), in an organization after an administrator’s invitation (see Adding a user).
- Click the link in the message you received.
- Enter your full name, choose the application language and accept the terms (when required). Then click Next.
- Set a password, or create the account through single sign-on when the organization uses it.
The activation link after registration is valid for 24 hours; after it expires you have to register again. An expired invitation to an organization ends with the message Your invitation has expired. Contact the administrator to receive a new invitation. The administrator can then send the invitation again from the user list. If the message does not arrive, check the spam folder and the address.
User language
The user language is the language in which the application displays its own elements, for example tab and button names. Data entered by users, such as options of a dropdown list in the schedule, stays in the language it was entered in. The default language for new users is set in System settings.
- Open the avatar menu and choose User profile.
- Choose a language from the Language list on the Information tab. The change is saved immediately, and the application switches to the chosen language.

Two-factor authentication
With two-factor authentication on, after you enter the password the Confirm your identity screen appears: a 6-digit code arrives at the user’s e-mail address, and you enter it and confirm with Confirm code. The code expires; the message Code expired or is invalid then appears, and the Send again button (available after a moment) sends a new code.
Users switch this protection on and off with the Two-factor authentication switch (Enable / Disable) on the Information tab. When an administrator has switched it on for the whole organization (System settings), the switch is locked, and its tooltip says that two-factor authentication is required by the organization.
Sign-in methods
An organization decides how its users sign in. The setting is in System settings > Organization, in the Login methods field, and has two values:

- Password + SSO — users sign in with an e-mail address and password, or through single sign-on (Microsoft or Google).
- SSO only — the password form stops working; everyone signs in through single sign-on.
SSO only suits an organization that wants sign-in governed centrally by the identity provider: its policies, the second factor and the offboarding process. A user who still tries to sign in with a password sees This sign-in method is disabled for your account. Contact your organization’s administrator.
The restriction does not apply to system administrators or to accounts synchronized with a domain directory — those accounts can use both methods. When a user belongs to several organizations, the restrictions of each of them apply.
Integrations: the setting applies to people signing in. A personal API token that an integration exchanges for an access token is not a sign-in method in this sense and keeps working under SSO only (see API and API token). An integration that signs in with a user’s e-mail and password stops working, so move it to a personal API token before switching the organization to SSO only.
Note: the Login methods field is visible only when sign-in through Microsoft or Google is configured in your FlexiProject environment.
